
Building report of a
Paper Model
or
The Uncanny Side of Scale
Models
by Gerardo Escobedo
Sainz
There are certain
universal and timeless questions in life like... What is Paper Modeling? How
can you build a 3D model out of 2D diagrams? Where can I find more information
about using paper as media to create scale models? I hope to shed some light to
these ageless questions.
Paper models are my
life... at least for the last 12 years, and it has been a happy trip. Let me
tell you about one model in particular: The F-14 Tomcat.
Although I had the
F-14 Tomcat Aggressor paper model kit in my stash for several months, I was not
brave enough to make use of my hobby knife in its pages. But then my wife gave
me the looks for which she is known – You Can Do It -, and so I took a very
deep breath and began cutting paper. The kit’s cover showed a very appealing
version of the Tomcat. Tough and complex, building it was going to satisfy me...
I knew it... and I believed it. For me, every model is an epiphany of life.
Paper models come in
many scales, from many countries – especially Poland -, and the range of models
in paper is endless. You can find the common themes like aircraft and armor, to
the wacky things like... your own head in paper, scale 1:1 of course. In a
nutshell, paper modeling is the art of converting 2D surfaces into 3D objects
using paper as a media.
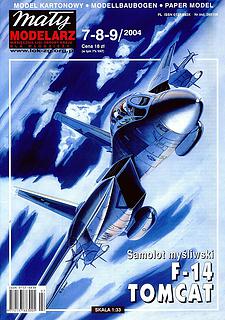
The F-14 Tomcat Aggressor
Configuration
With more than 600
elements in 18, A4-size cardstock pages (weight is about 80 lb.), in offset
printing, the Polish “Mały Modelarz" publishing house takes its own digital
design department to the next level with this kit released in 2004. The F-14
Tomcat in 1:33 scale kit includes 2 Hughes AIM-54 Phoenix air-air missiles, 2x
AIM-9 Sidewinder air-to-air missiles and 2x AIM-7 Sparrow air-to-air missiles.
Other additions are:
complete cockpit interior, arrest hook, movable wings, and other details.
Mały Modelarz has been
a Polish publisher of paper models since 1957. But there are other BIG names in
the published paper modeling world: Kartonowy Arsenał (better known as Halinski), GPM, Modelik, Orlik, Hobby-Model,
Orel, WAK... plus a countless designers that offer their models via the
Interweb. Did I mention there are thousands of free –to-download legal paper
models as well?
Back to the F-14... Besides
the paper model kit itself, currently priced at $15.00 US Dollars, I used
laser cut frames made of cardboard (price $10 US Dollars), and aftermarket
canopy made of plastic (price $5.00 US Dollars). This gives the model its
“skeleton”, so it can be supported from within. I can rely on my self-made
internal structures, using good old empty cereal boxes (I guess I still have
some laying around as gift from our former member Tom Sprawls when I was
appointed president of the Alamo Squadron club – what a gift, right?), but with
this model, I wanted it to give me a little more satisfaction. And for $30 US
Dollars, it looked like a good deal.
I started building the
cockpit, as is particularly usual with scale paper airplane models. Even though
all the details on the dashboard and dials are very well drawn on the kit, I
added plastic for the screens (old cellular phone protectors). Then for the
controls in the dashboards, I used little cuts from earphone cables (the inside
little cables), and that gave some details to the dashboard buttons. Everything
else is made of paper.

The seats are very
special area. The provided parts are very good designed, and they came out
looking pretty good. I used 1 mm cardboard for the back, painted with black
felt pen and then I scribed the couture for a 3D effect.

Tools of the Trade
All the paper parts are cut using a
hobby knife #11 on a self-healing cutting mat. And glue pieces with water-free white
glue (i.e. Elmer’s glue). Nothing out of the ordinary. Paper should be cut
in one single stroke per line or side on the kit; this prevents creasing on the
paper piece.
A lot of engineering was put into
the design of the wings. I don't say this is the first model with this kind of
engineering, but anyway, it is a great pleasure to build a model knowing that
Math was applied. The wing pieces are long paper polygons that should be cut
and fold carefully, as you don’t want to break or stain them. So clean hands is
a must for building a paper model... or at least while you cut the paper.

Forums
Another highly
valuable tool in paper modeling is the internet forums. Due to the fact that
90% of the commercial paper model kits come from Poland, and that the
instructions are clearly explained - in Polish! -, you need photographic
information from other modelers; if from Poland, the better… as they seem to be
born with a paper kit in one hand and a camera in the other. Photos galore
to follow the steps in building paper models. But I’ve found amazing references
also in German, Czech and Slovak forums that make building the model a breeze.
Now we can add the
mechanical control wires inside the body of the airplane to regulate the
movement of the wings. It could be really fun to add them, and can be
accomplished with help of other modelers in the forums. I saw that the wires
were not totally correct on the original model, but for me it worked just fine
with just a little tweak in the wires. To put together the front and back
pieces of the airplane, I used an unorthodox method: Instead of just apply
glue, I inserted 3 bolts in the bulkhead. With this method I killed 2 birds
with one stone:
a) parts get strongly
attached to each other
b) they add weight
which can prevent the plane to tail-sit
For the aft upper
fuselage, I built the skin pieces before add them to the internal structure. I
painted red the inner part of the wing that attaches the flap with a felt pen,
and can only be seen in certain angle. But the sweep wing mechanism works just
fine! Although you have to manually move BOTH wings, it works OK.
Paper kits include
strips you can cut that will help you to put two pieces together and have clean
seams. This model though, was designed with the butt-to-butt method, in which
the two internal formers are glued to complete the airplane fuselage.
Deep inside the air
intake, the F-14 has fans to get air into the engine, which I cut from the kit
itself, glued to the laser frames and painted with black matte spray. I doubt
many people will take the time to see inside the air intakes, but it feels good
to know they are there!
For the vertical control surfaces, I
cut the pieces from the kit, and apply a light moisten layer with water in my
finger, which I pass across the center of the paper piece; then proceed to use
a bronze rod to bend the paper. With this technique, the paper is prevented to
be “broken”, and avoid that the edge of the control surface gets wrinkles.
The engine was one big amusing
element to build. There are lots and lots of feathers that forms the exhausts.
The engine part inside the exhausts are made of laser cut frames, which I
painted them with silver felt pen. This method mimics the metallic finish to the
engine. After the exhaust are ready, I added the feathers, but not only glue
them, but sculpt them to a desired shape, in my case, closed as when the plane
is ready to takeoff.


Painting a Paper Model
Now something on painting a paper
model… there is none! Well, not in the same sense as you do in a plastic model.
Since the paper kit already comes painted, all you have to do is to paint the
cut edge of the paper part, so when put together two pieces, you don’t get a white
line in the seam. Usually you paint the edges with a pelt pen of the same
color. Many advanced paper modelers use acrylics to get the exact same color as
on the paper part, and then apply the paint on the edge with a small brush.
What is the fun building a model with no painting involved, you would ask?
Well, you still have to sculpt the paper into the intended 3D shape. And that
is fun enough to keep you very busy!
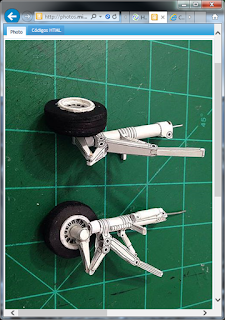
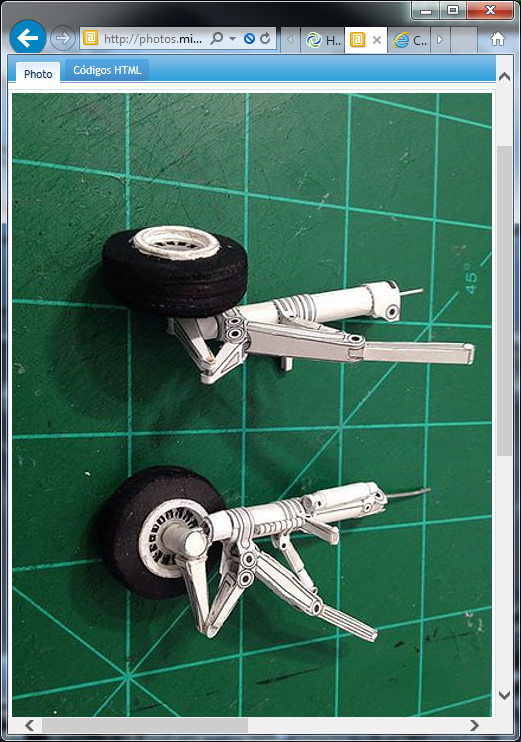
The wheels are made of circular cuts of cardboard. I use a
circular cutter from Olfa, that resembles a drafting compass, but with a knife
instead of a pencil. I cut 8 circles for each wheel, and glued together as a
sandwich. Once dried, I painted the wheels with matte black acrylic.
The one thing I like the most in a paper jet airplane is
the landing gear struts. I’ve build paper landing gears for F-16, F-18, F-15,
F-117 and now F-14, and those things are so complex in a paper model, that I
can say they not only resemble the real thing – like expected in any scale
model – but more so if you think that each strut and cylinder in the landing
gear is a roll of paper. These rolls are put together along with torque arms,
forks, actuators, lock pins and trunnions - all made of nothing but paper. I’ve
noticed that on my paper jet models the landing gear struts are the least
visualized. I think I need to point them out more clearly… like a 16 X 24 photo
of a strut, none the less!
The aftermarket plastic canopy (I still refuse to make them
with the vacuum method) was submerged in a batch of Future. This is the first
time I use Future for a plastic so thin, I didn’t know what to expect – hey!,
maybe it was going to be disintegrated! All my friends at the Alamo Squadron modeling
club do the same thing for their plastic canopies... but the plastic is hard
and thick... not the ones for paper kits. Nonetheless I got very good results
with it, and I plan to keep on doing it.
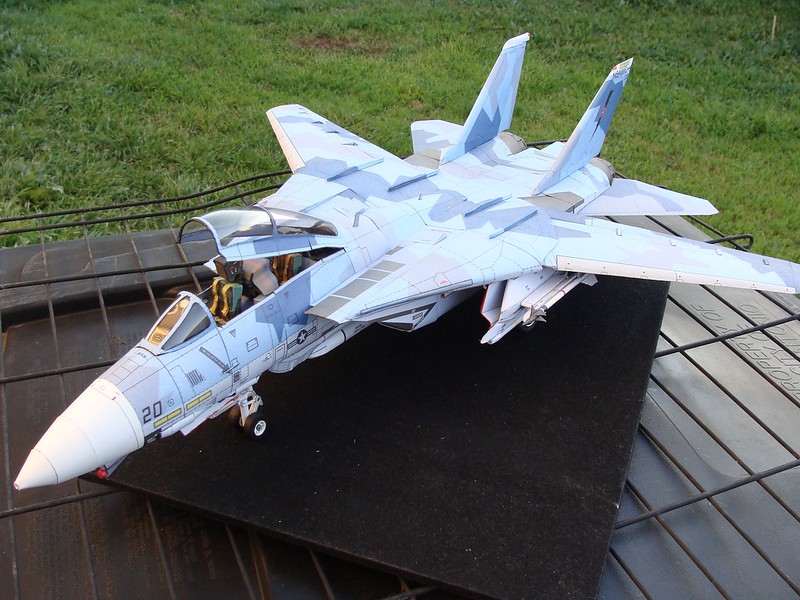
The final touches on the F-14 Tomcat Aggressor paper kit
are the little details like scoops, ordnance, antennas, and the like.
Looking at a scale model that came
out of the pages of a book – literally – is an amazing experience. Granted, in
comparison with plastic modeling, paper modeling still has a long journey ahead;
and after a hundreds of years paper modeling is being around (I have a model
designed in 1529), it is now that, thanks to the Internet, we can find a myriad
of subjects in paper, and paper modelers of all ages, from all nations.


References & Free Models
You can find more about paper
modeling in this forum:
www.papermodelers.com
And for those of you rogues out
there, I leave you here some web sites where you can download free and legal
paper models to your computers and print them at home.
Are you looking for a specific
model? E-mail me!
Northrop F-5 Airplane
http://paperaircraftmodels.com/models/product/40-northrop-f-5a-freedom-fighter
NASA Space Shuttles
http://www.axmpaperspacescalemodels.com/download1.html#.Vz3jE3IUVkA
P-51 Mustang Red Tails
http://www.ecardmodels.com/index.php/1-48-north-american-p-51d-mustang-332-fighter-group-301st-fighter-squadron-paper-model.html
Yamaha YZR-M1 Motorcycle
http://global.yamaha-motor.com/showroom/papercraft/realistic/yzr-m1-us/
Titanic, Olympic, Britannic
http://www.currell.net/models/mod_free.htm?filter=ship
Tiger I Tank
http://paper-replika.com/index.php?option=com_content&view=article&id=8305:wwii-tiger-i-tank-paper-model&catid=38&Itemid=207739
Ford Mustang GT500
http://crackskullmodels.blogspot.com/2012/04/building-ford-mustang-shelby-gt500-kr.html
Battleship Bismarck
https://web.archive.org/web/20150408054526/http://www.zioprudenzio.it/fok-ship.html